Let’s talk about teaching Parts of Speech in middle school.
You may be thinking: Um… Our standards don’t really touch on Parts of Speech, so… Why are we talking about this?
Look. If you’ve ever tried to “reteach adjectives real quick” because your students aren’t using specific language, they’re not describing anything, and they keep using the same words repeatedly (no vocabulary)…
…then hi. Welcome. You are not alone. 😅
The problem isn’t that parts of speech aren’t important.
They are.
Parts of speech are basically the LEGO pieces of writing.
But the way grammar is often taught makes students feel like it’s:
- random
- disconnected
- confusing
- and mostly just something they’ll forget immediately after the quiz
So here’s the good news:
You don’t need a grammar workbook.
You need a repeatable system.
And the system I’m sharing today is the one I use with my Parts of Speech Graphic Organizers — because they’re not meant to be “do this page and turn it in.”
They’re meant to be a student-built reference tool that actually transfers into real writing.
The Big Goal (aka: why teaching grammar with graphic organizers actually works)
Let’s start with the purpose, because this is what makes my whole approach different:
These graphic organizers are NOT worksheets.
They’re thinking tools designed to help students:
👀 see how language works
🧠 understand why writing sounds unclear
💡 apply grammar to real writing
📓 build a personal reference they can return to
That’s the shift, because grammar “sticks” when students use it to fix something real.
…Not when they circle 14 prepositions on some worksheet and then never think about it again.
“What order do I teach Parts of Speech in?”
Teachers always ask this like there’s one sacred order written on a stone tablet somewhere.
There isn’t. 😂
But here’s a super helpful framework that makes it easier:
Foundation:
- Nouns
- Verbs
- Pronouns
Clarity & Detail:
- Adjectives
- Adverbs
- Prepositions
Flow & Structure:
- Conjunctions
- Verbals
Voice & Control:
- Interjections
From there, this is the real teacher-friendly rule (the one that saves time):
Teach the part of speech that solves the problem students are currently having in their writing:
- vague writing → teach adjectives
- confusing “they/this” → teach pronouns
- run-ons → teach conjunctions
- fragments → teach prepositions
- flat or vague sentences → teach the power of verbs
- lack of tone or voice → teach interjections
That right there is the difference between grammar that matters and grammar that feels like punishment.
The Realistic Timing (because we live in the real world)
You do not need a 45-minute grammar lecture. Your realistic flow is:
- 5–10 min discovery + discussion
- 5–15 min building/filling in the organizer
- 5–15 min applying to their own writing (instead of a boring worksheet!)
- 5 min sharing aloud the before & after of what they changed
That’s it. That’s the whole mini-lesson.
And it fits into basically any schedule — even if your class period is a chaotic 42 minutes long – er, short, and the bell always rings mid-sentence.
The Parts of Speech Mini-Lesson Routine (the exact system to repeat every time)
This is the step-by-step process you laid out, and it’s honestly the reason this resource works so well.
Step 1: Start with the writing problem (NOT the definition)
You don’t start with:
“Today we will define prepositions…”
Nope. You start with what students feel:
- “Why does this sentence sound weird?”
- “Why is this so vague?”
- “Why does this feel choppy?”
- “Why is this confusing?”
Once students see the problem and notice it themselves, they actually tend to care more about the solution.
Step 2: Discovery before explanation (curiosity first)
This is where most grammar instruction goes off the rails.
Teachers feel pressure to explain EVERYTHING.
But your approach is to let them notice first.
Students:
- look at examples
- compare sentences
- notice patterns
- feel when something sounds “off”
And you ask questions like:
- “What do you notice?”
- “What changed?”
- “Which one sounds clearer?”
- “Why does your brain want more information here?”
Step 3: Use the teacher version as a guide (not a script)
Your role isn’t to lecture. (“Today we’re studying participle phrases.”)
Your role is to show students a few sentences that, in this example, all just so happen to contain participle phrases:
- confirm what they notice (“Yes, lots of words that end in -ing, you’re right.”)
- clarify misunderstandings (“Right, they do look like verbs, but they’re not.”)
- give language to their thinking (“Everything you noticed? Yeah, that’s called a participle phrase. Yup, it has a name.”)
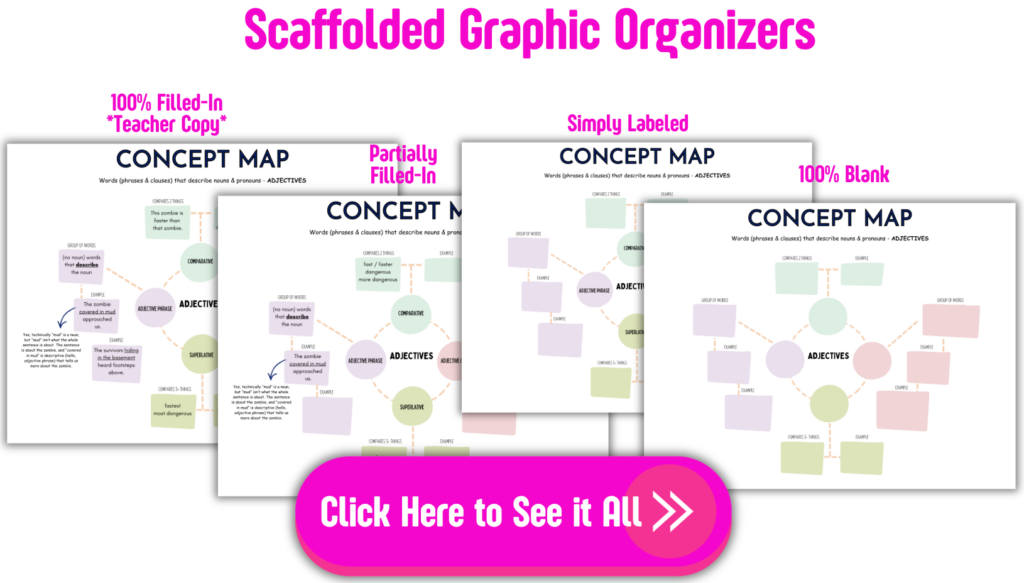
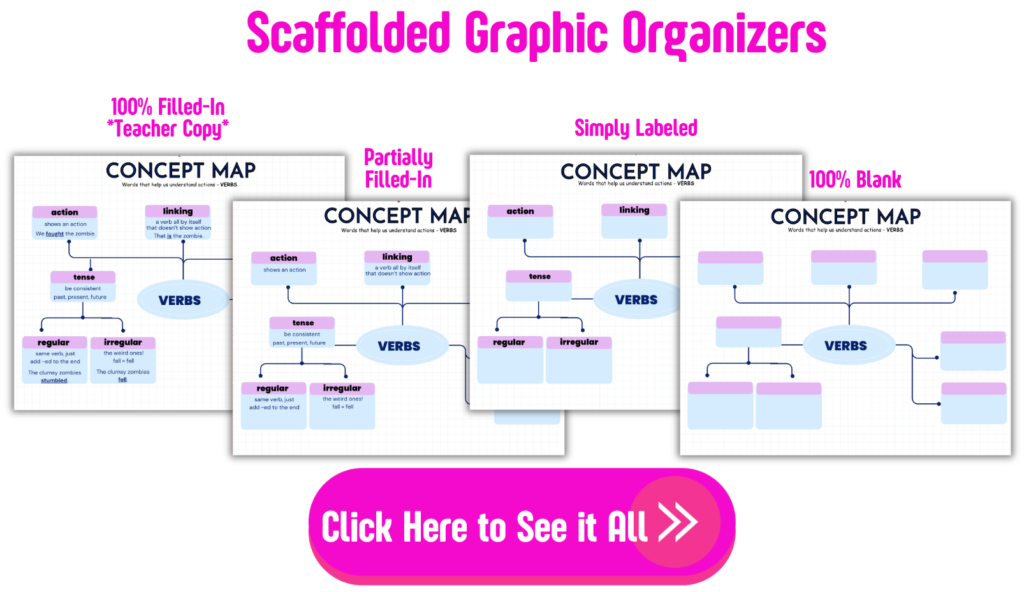
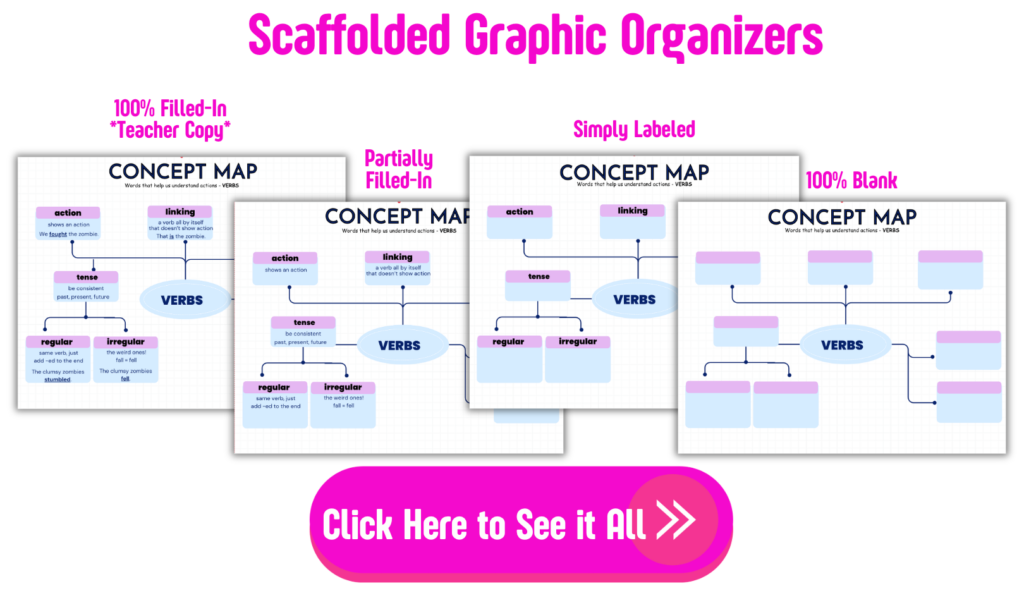
Step 4: Choose the right level of support (instant differentiation)
This is one of my favorite parts of using graphic organizers to teach grammar.
For various reasons, I bounce around between a:
- 100% filled-in teacher version
- partially filled student version
- blank version
…So I can adjust my teaching in real time:
If students are struggling → we build it together
If students are on level → we use one that’s partially filled-in
If students are advanced → we use blank + challenge mode
Step 5: Apply to real writing (NON-NEGOTIABLE)
“Grammar lives in revision, not in isolation.”
Students return to something they already wrote and:
- highlight
- circle
- revise
- add
- fix
- experiment
It could be something that was already formally graded and returned. It could be something as informal as yesterday’s reading response or last month’s journaling prompt that never saw the light of day.
Doesn’t matter!
The non-negotiable is that students implement the concept into their OWN writing—not in a worksheet (less for you to locate, prep, and grade while SO much more meaningful for students since it’s what THEY wrote).
I cannot emphasize the importance of this enough.
Even one small change is enough because grammar becomes useful when it improves THEIR writing.
Ok, I’ll stop using all-caps.
What These Organizers Look Like in Action (and why kids actually remember)
Think of graphic organizers like brain maps or concept maps — which means students aren’t memorizing random rules.
They’re building a mental web.
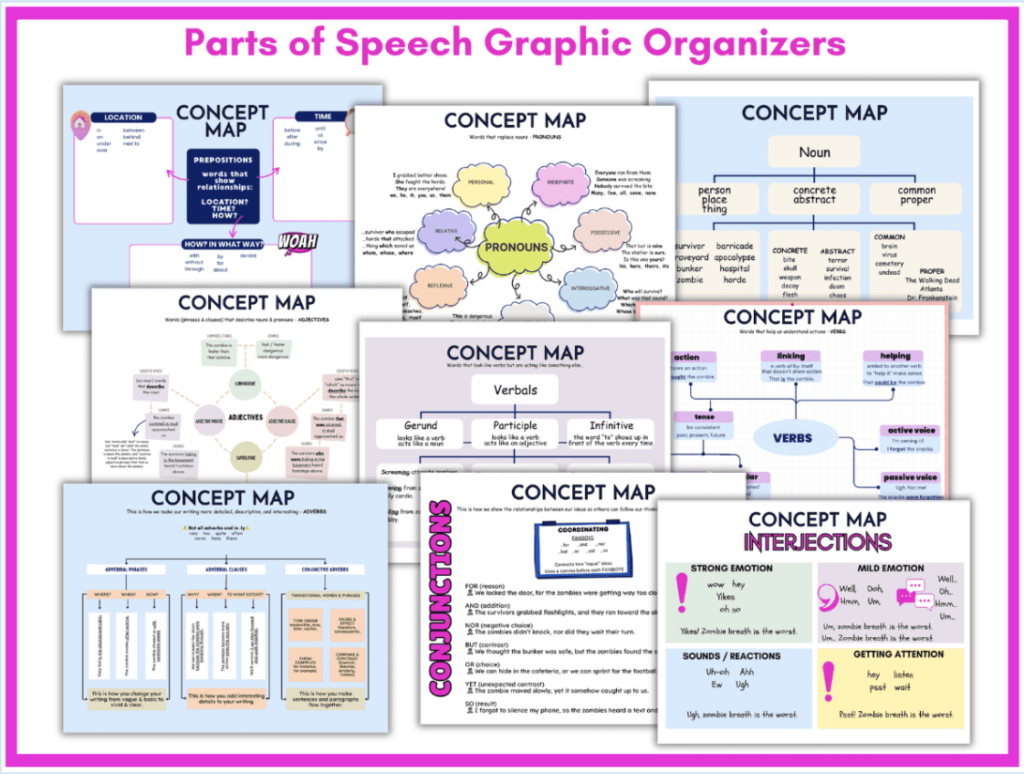
Here are a few examples pulled right from my own set:
Verbs: “To Be” verbs vs. strong verbs (the glow-up is real)
I include a clear “to be” verbs list (am, is, are, was, were, be, being, been) with sample sentences like:
- “The zombies were scary.”
- “The hallway was dark and quiet.”
And then you show revised versions without those weak “to be” verbs, like:
- “The zombies lunged and groaned…”
- “The hallway echoed with whispers and shadows.”
“Here’s why writing sounds flat… and this is how to fix it.”
Adjectives: words, phrases, and clauses (but make it understandable)
I break adjectives into:
- adjective words
- adjective phrases (“covered in mud”)
- adjective clauses (“that was covered in mud”)
And the explanation is so teacher-friendly:
Yes, “mud” is a noun, but the sentence is about the zombie — and the phrase is describing the zombie.
That’s the kind of clarity kids can actually follow.
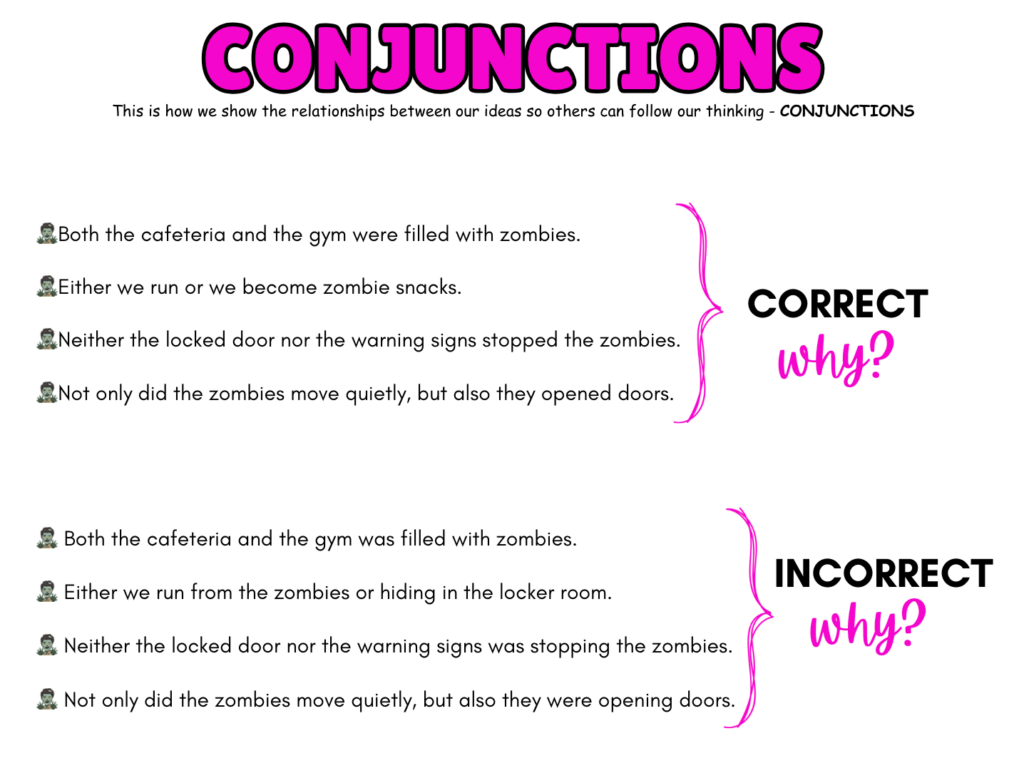
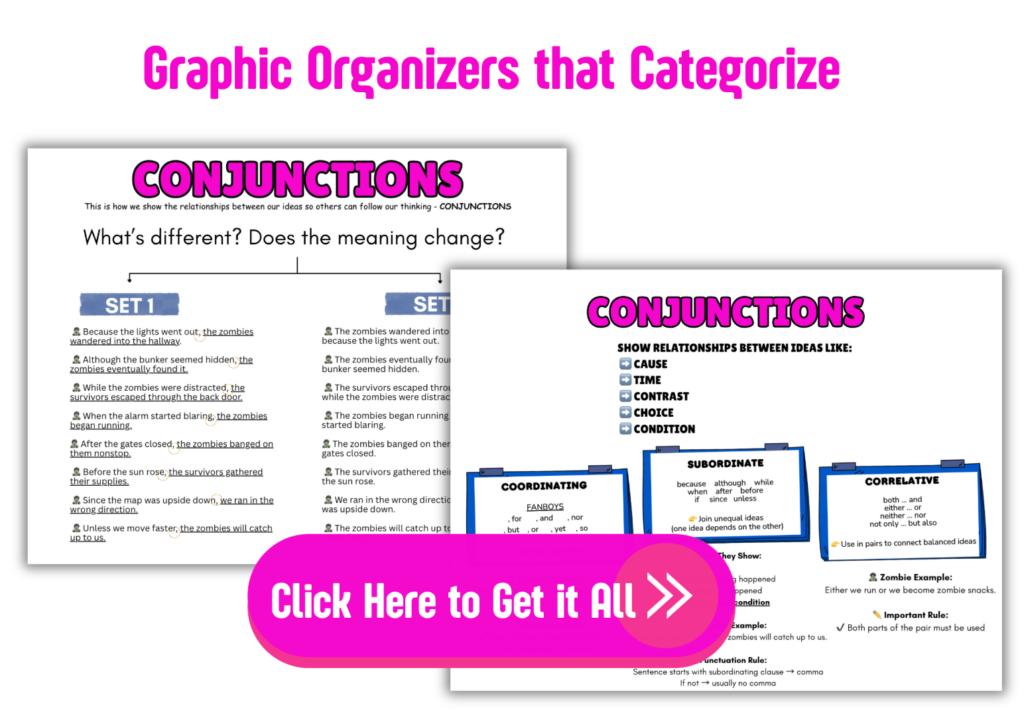
Conjunctions: the cleanest breakdown ever (FANBOYS + subordinate + correlative)
I give students three buckets:
Coordinating (FANBOYS)
for, and, nor, but, or, yet, so
…and I explain the relationship (cause, contrast, choice, etc.)
Subordinating
because, although, while, when, after, before, if, since, unless
…and I teach the comma rule in a way that makes sense:
If the sentence starts with the subordinating clause → comma.
Correlative
both/and, either/or, neither/nor, not only/but also
…and I show that balance or “parallelism” matters.
This is SO useful for fixing run-ons and choppy writing without making students hate grammar or writing.
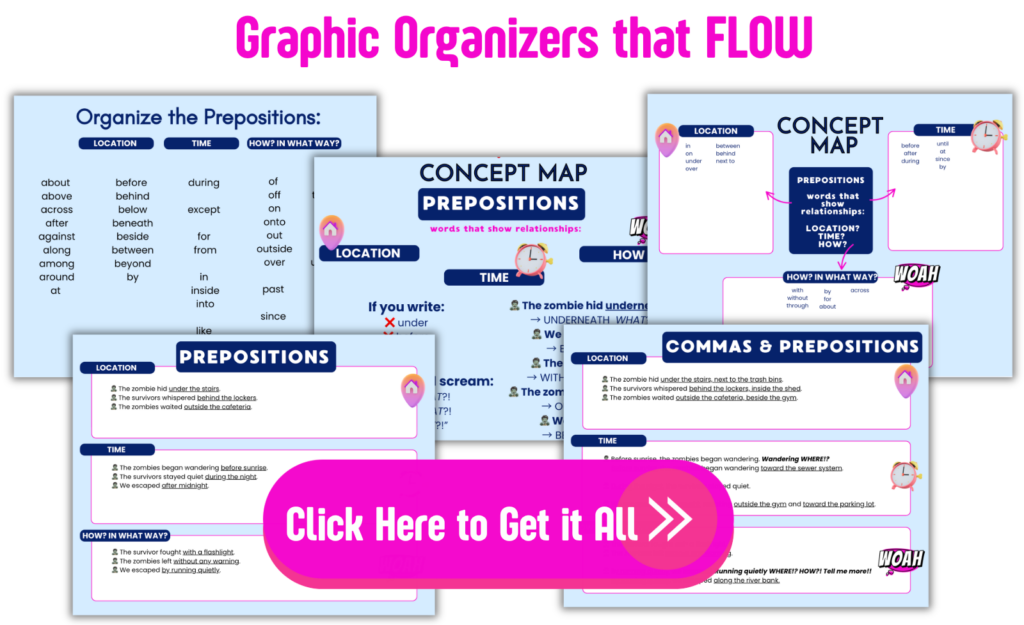
Prepositions: the “UNDER WHAT?!” trick (iconic)
This might be my favorite page in the whole resource because it’s hilarious AND effective.
I basically teach students that if you write words like:
- under
- before
- with
Your brain should scream:
“UNDER WHAT?! BEFORE WHAT?! WITH WHAT?!”
We talk about all the prepositions that we can. I’ll even give the a little handout (or just broadcast it on the projection board for reference).
Then I have them organize prepositions by:
- location
- time
- how/in what way
It’s simple, visual, and brain-sticky 🙂
From there, we can start using prepositions to solve problems like specificity in writing, or when (and why) to use commas.
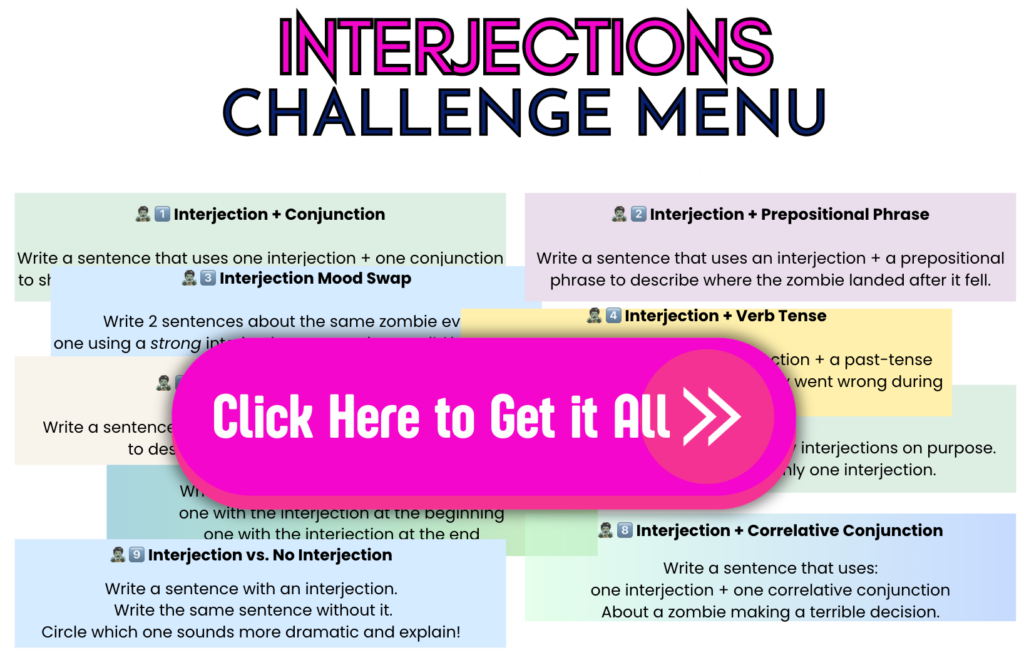
Interjections: tone + voice without the cringe
I categorize interjections by:
- strong emotion
- mild emotion
- sounds/reactions
- getting attention
And then I’ve got a whole challenge menu (my students EAT this up), like:
- mood swap
- interjection placement
- “fix the overuse”
- interjection vs no interjection
That’s voice practice disguised as grammar. I love a sneaky win!
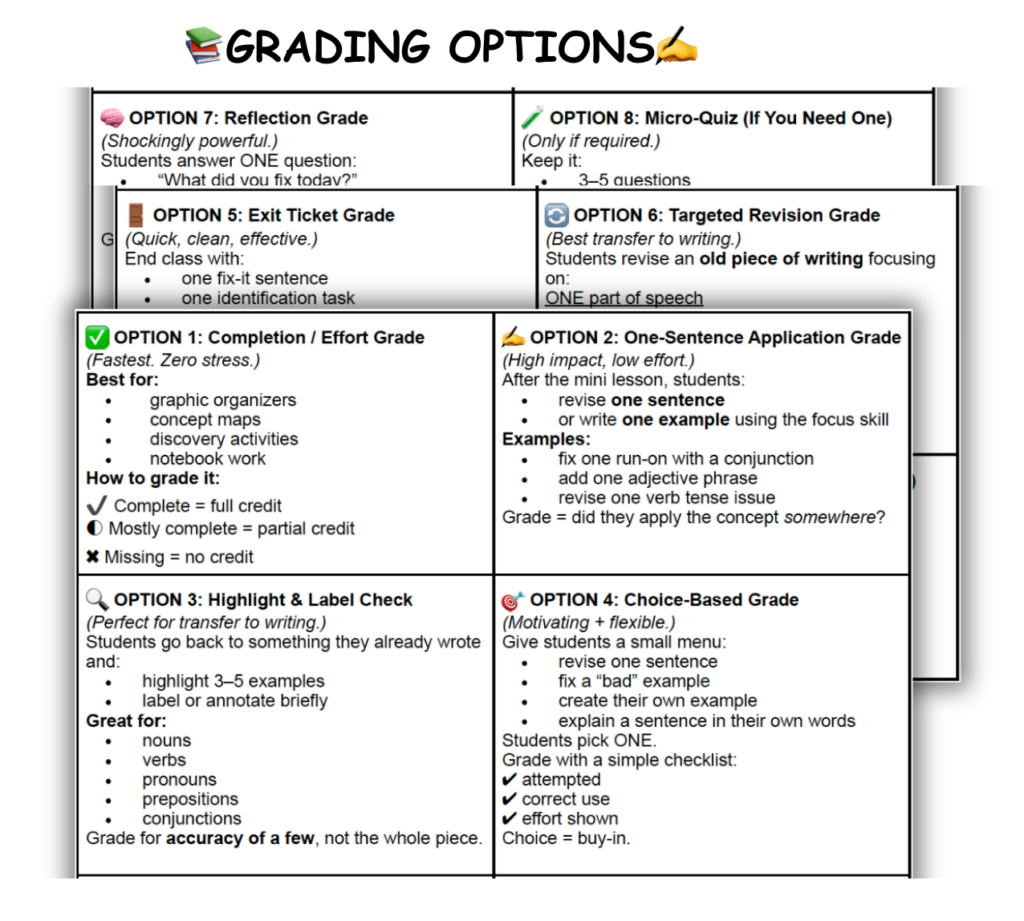
“Okay, but how do I grade all this?”
Um… You don’t…Necessarily. Grading doesn’t have to mean staying late or taking the work home. Not at all.
There are CREATIVE ways to grade that involve embedding the skill into something else that you were already going to grade anyway
When you grab my collection of Parts of Speech Graphic Organizers, I include a whole set of quick grading options so you can pick and choose all throughout the year (keeps students on their toes and allows you to go home earlier each day, ha!).
Here’s a look-see:
Your “Try It Tomorrow” Plan (15 minutes, no prep spiral)
If you want to try this system tomorrow, do this:
- Pick the writing problem you’re seeing most right now
(vague? choppy? run-ons? flat verbs?) - Do a 5-minute mini-lesson with examples from recent texts
- Fill in an organizer together (partially filled version = easiest start)
→ Get mine, or create your own.
- Have students revise ONE sentence from their own writing
- Let them share a few “before & after” examples aloud (super important so that they’re not just hearing your examples–they’re hearing each other’s).
Final Thought: This Is How Grammar Becomes a Writing Tool Instead of a Random Worksheet
When it comes to grammar and how to teach it in a way that actually makes it over to their writing, middle schoolers need:
- quick clarity
- visual structure
- real revision practice
- and repeatable, consistent application routines
That’s why my parts of speech graphic organizers work. They make grammar useful which means it becomes memorable which leads to writing improvement… And that’s the whole point. 💛
INCLUDES FILLED-IN TEACHER VERSION + PARTIALLY-FILLED STUDENT VERSION FOR SCAFFOLDING + BLANK VERSIONS FOR FLEXIBLE LEARNING NEEDS.
All graphic organizers are editable.