Today’s post is a teaching tool for class practice. At the conclusion of a unit or really anytime you are ready to practice a group of related skills, it’s time for batching the learning!
I’ll explain step by step so that you can use this tool in your classroom tomorrow!
Instructions & Ideas for the Teacher
Step 1
Think of 2 – 3 skills or tasks your students have already learned, but still need to practice in an ongoing way (i.e. vocabulary, grammar, punctuation, etc.)
Step 2
The student will divide a sheet of paper into eight squares by folding it and unfolding it. Each square will contain a drawing/sketch/image that conveys the main idea of the sentence. (These squares could be completely independent of each other in topic, or they could be somehow thematically linked or even tell a story. I leave that up to each individual student. They enjoy having that choice).
Step 3
The student will describe a scene / scenario / situation using a vocabulary term (could be old or new or a combination). Personally, I like having them choose any 2 – 3 new terms and then have the rest be “old” terms because it keeps those words active in their minds. Again, all squares could relate to each other or they could be independent of each other. They may add prefixes/suffixes as needed and as is appropriate so the sentence makes sense (great opportunities for mini-lessons on parts of speech, how words are used in real life, etc). Circle, underline, or hi-light the term so it’s easy to recognize at a glance. Another learning moment you can take advantage of is to have them mark any context clues that help another reader infer the meaning. In fact, that can be quite effective in and of itself—simply have them think about what synonyms, antonyms, or “clue” words they can add to their sentences to show the meaning.
Step 4
Have students circle, underline, or hi-light one more component you would like to draw their attention to (prepositions? prefixes or suffixes? roots? punctuation? grammar? parts of speech?). — But not all of those at once that I just listed! Those are simply ideas to get you started.
What I Did
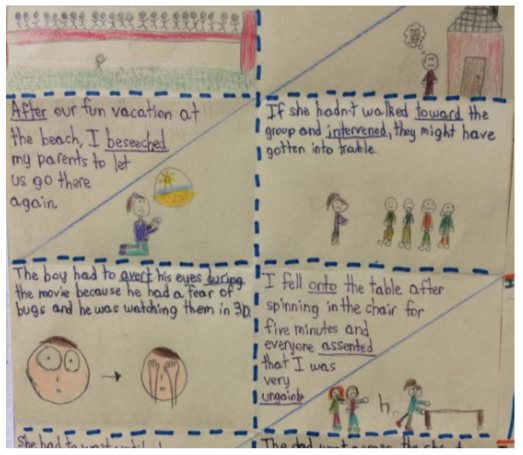
In the image below, I only told my students they were doing vocabulary sentences with images to represent the main idea of each sentence. I later had them go back and mark their prepositional words / phrases since I wanted a quick yet authentic way to review and reteach that concept. You can see in the image that this student identified the prepositions, but not the prepositional phrases. I had others like this, so that turned into a little mini-lesson that they were able to go back and work deeper with.
Finished product example (could be done digitally as well):
Next Steps
This is a good activity to start the day before you have a sub so you can set the expectations, monitor the work flow, etc. Then have students finish up with the sub. Provide one more step, like “circle all the adjectives” or “mark the prepositional phrases you used” since it adds in one more relevant step. It can also make for a great way to review other concepts authentically that the students themselves have been able to create.
Extension & Differentiation
For struggling students, reduce eight boxes to four. Or have them do all eight, but only four for vocabulary and four for prepositions. Another idea (so their work doesn’t “look” different from other students’ work) is to have them verbalize their sentences/thoughts in a recording device and then play it back and copy down the sentences. For advanced students, challenge them to include two vocabulary terms in some of the sentences, or to identify other elements beyond just the ones the other students are doing. Likewise, you may have some students who choose to make all eight squares “thematically” related around a central topic or even a storyline OR all eight boxes could be completely unrelated in topics.
Stop feeling like you have to choose between prepping for class and enjoying family time by clicking the button below to grab several weeks of free bell-to-bell lesson plans for 6th, 7th, and 8th grade.


